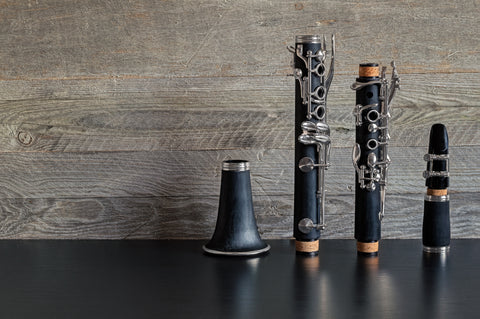
Let’s go over the parts of the clarinet before we start assembling the instrument.
The clarinet has different parts to it:
- a bell
- a lower joint (the longer piece with keys)
- an upper joint (the shorter piece with the keys)
- a barrel
- a mouthpiece
- a ligature
- a reed
How to assemble a clarinet?
- Connect a bell with a lower joint by gently twisting onto the lower joint. Make sure to twist each piece into place gently, without rushing or pushing them too hard. Applying cork grease will help eliminate the resistance and smoothen the process. This will make assembly easy and keep the joints of your clarinet in good condition.
- Connect the joints by twisting the upper joint onto the lower joint. When twisting clarinet joints together, make sure that the keys of the two joints don’t bump into each other, this can damage them.
- Align the bridge mechanism. You need to make sure the bridge mechanism between the two joints is aligned.
- Connect the barrel to the upper joint.
- Twist on the mouthpiece.
- Align the mouthpiece (the hole in the mouthpiece should be aligned with the back key on the upper joint).
- Moisten the reed with water or your own saliva.
- Put on the reed. Place the reed on the mouthpiece so that the flat side of the reed is against the mouthpiece opening. Make that the reed is vertical and aligned with the mouthpiece, move it up or down the mouthpiece until you see a bit of mouthpiece behind the reed.
- Secure the reed with the ligature. Put the ligature onto the mouthpiece and reed. Make sure that it is low enough to cover the bark of the reed but not the vamp, which is the carved part of the reed. Tighten the ligature to secure the reed’s placement.
Congratulations! You assembled a clarinet!
Now as you assembled your clarinet and played your favorite piece another question comes to mind. Is it OK to leave the clarinet assembled?
How to disassemble a clarinet?
Now we will go over the assembly process in reverse. You will be working from top to bottom.
- First, you need to remove the ligature gently. Unscrew and remove the ligature from the mouthpiece and reed.
- Then, remove the reed. Carefully take the reed off the mouthpiece and place it back into its plastic sleeve or reed case.
- Separate the mouthpiece from the barrel by twisting it off gently.
- Place the ligature back on the mouthpiece, put the mouthpiece cap on the mouthpiece, and put them inside the case.
- Clean the clarinet thoroughly.
- To remove the barrel just wist it off the upper joint and place.
- Then, twist off the upper joint.
- Separate the bell from the lower joint by twisting them apart from each other.


 440 West 41st Street Suite 3-A New York, NY 10036-6815
 Call Us at (917) 497-4600

Be the first to comment